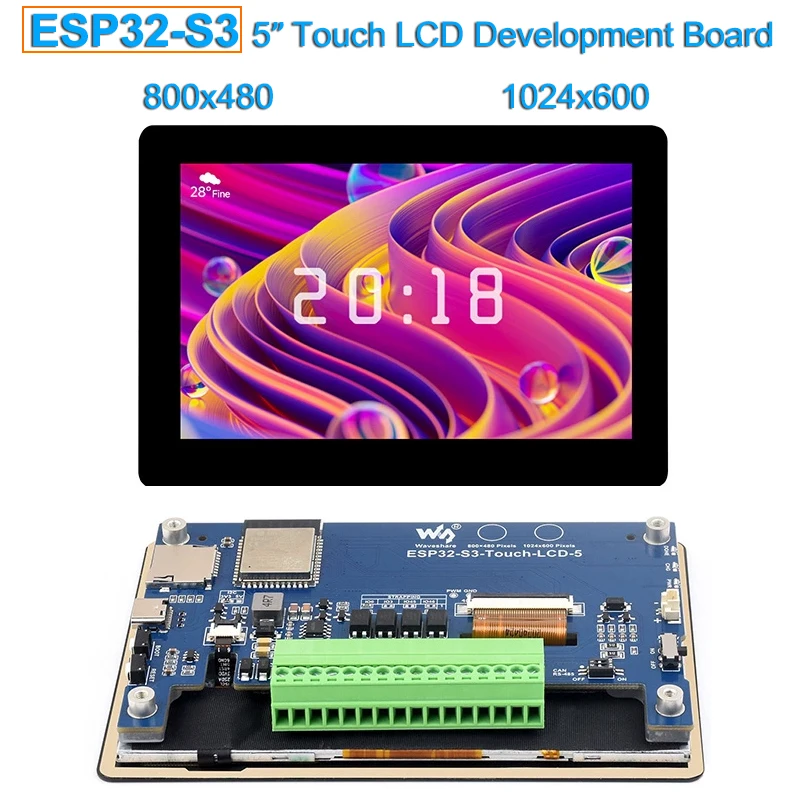
ESP32-S3 5inch IPS Touchscren HMI LVGL GUI Development Board Capacitive Touch LCD Panel ESP32 Display for Arduino IDE VSCode
You will be redirected to AliExpress to complete your purchase
Specifications
- Brand Name
- NONE
- Origin
- Mainland China
- Display Mode
- null
- High-concerned chemical
- None
- Resolution
- 800*480
- Model Number
- ESP32-S3-Touch-LCD-5B
- Type
- TFT
- is_customized
- Yes
- LCD Size
- 5.0 inch
- Resolution 1
- 800x480 pixel
- Resolution 2
- 1024x600 pixel
- 5-point Touch
- Yes
- Touchscreen
- Capacitive Touch
- Display Panel
- IPS
- Display Color
- 65K RGB
- Viewing Angle
- 160°
- Viewing Angle 2
- 178°
- 2.4 GHz Wi-Fi
- Yes
Product Description
Wiki:www.waveshare.com/wiki/ESP32-S3-Touch-LCD-5
ESP32-S3-WROOM-1-N16R8
The SoC with WiFi and Bluetooth, up to 240MHz operating frequency, integrated 8MB PSRAM and 16MB FlashTF card slot
USB Type-C port
BOOT button
Press and hold while powering on for program burningRESET button
Optocoupler isolation
Touch panel connector
5inch display panel connector
RS485 and CAN terminal resistors selection
close by defaultBattery power supply ON/OFF
3.7V single lithium battery GH1.25 header
Status Indicators
DONE: Lithium battery charging completed indicator
CHG: Lithium battery charging indicator
PWR: Power supply indicator
(the CHG will blink and DONE will light on when connecting with DC power supply and without lithium battery connected or battery switch is OFF)
7-36V DC power supply terminal
I2C interface terminal
VOUT pin output 5V/3.3V (switching by onboard resistor)CAN interface terminal
RS485 interface terminal
Digital output
5~36V, open-drain output, output load: 450mA per channel (MAX)Input signal common terminal
NC: dry contact passive input
Connect to power supply positive: digital input low active, for NPN wet contact active input, 5V-36V DC
Connect to power supply negative: digital input high active, for PNP dry contact active input, 5V-36V DCDigital input
5~36V, supports passive / active input (NPN or PNP)I2C VOUT output selection
for switching output valtage and I/O level of I2C VOUT, 3.3V by default
CS8501
Lithium battery recharge managerPCF85063
RTC chip for providing accurate time controlAP3032KTR-G1
Display backlight boost converterCH422G
IO expansion chip
SP3485
RS485 transceiverTJA1051T/3/1J
CAN transceiverSGM2212-3.3
800mA low-noise LDORechargeable Lithium battery
Model | ESP32-S3-Touch-LCD-4.3B | ESP32-S3-Touch-LCD-5 | |||
basic parameters | |||||
Processor | High performance Xtensa 32-bit LX7 dual-core processor, up to 240MHz main frequency | ||||
Wi-Fi / Bluetooth | Supports 2.4GHz Wi-Fi (802.11 b/g/n) and Bluetooth 5 (LE), with onboard antenna | ||||
Flash/PSRAM | 16MB Flash + 8MB PSRAM | 8MB Flash + 8MB PSRAM | 16MB Flash + 8MB PSRAM | 8MB Flash + 8MB PSRAM | |
Power Supply | TypeC 5V + DC 7-36V | TypeC 5V | TypeC 5V + DC 7-36V | TypeC 5V | |
LCD parameters | |||||
Resolution | 480x480 | 800x480 | Standard Version: 800x480 | 800x480 | |
Display Interface | RGB | ||||
Display Panel | IPS | ||||
Viewing Angle | 160° | Standard Version: 160° | 170° | ||
Touch Type | capacitive | ||||
Touch Panel | Toughened Glass | ||||
communications interface | CAN, RS485, I2C, USB | CAN, RS485, I2C, USB, UART, Sensor | CAN, RS485, I2C, USB | CAN, RS485, I2C, USB, UART, Sensor | |
Digital Input | - | 2DI, 5~36V, passive input / active input (NPN or PNP), built in bi-directional optocoupler | - | 2DI, 5~36V, passive input / active input (NPN or PNP), built in bi-directional optocoupler | - |
Digital Output | - | 2DO, 5~36V, open-drain output, output load: 450mA per channel (MAX) | - | 2DO, 5~36V, open-drain output, output load: 450mA per channel (MAX) | - |
others | |||||
Operating Temperature | 0℃ ~ 65℃ | ||||
Dimensions (L×W) | 84.2×84.2mm | Standard version: 112.4×75.1mm | 106.1×67.8mm | 127.7x87.45mm | 192.96×110.76mm |
FAQ
① Restart the COM port in UCANV2.0.exe and press the ESP32-S3-Touch-LCD-5 reset button multiple times.
② Uncheck DTR in the serial port debugging assistant.
If there's no screen response after programming the code, check whether the correct configurations are set in Arduino IDE -> Tools: Choose the corresponding Flash (8MB) and enable PSRAM (8MB OPI).
Check if the library is installed. Please refer to installation steps.
Because the path to install the library is in Chinese.
Please refer to the following steps:
1. Before running the demo, you need to install the libraries.
2. Please refer to this video.
3. Run and burn the original demo.
Please install Arduino v3.0.2-h to solve this issue
Product information last updated on November 27, 2025